Thursday, June 10, 2010

Open Door Surgery

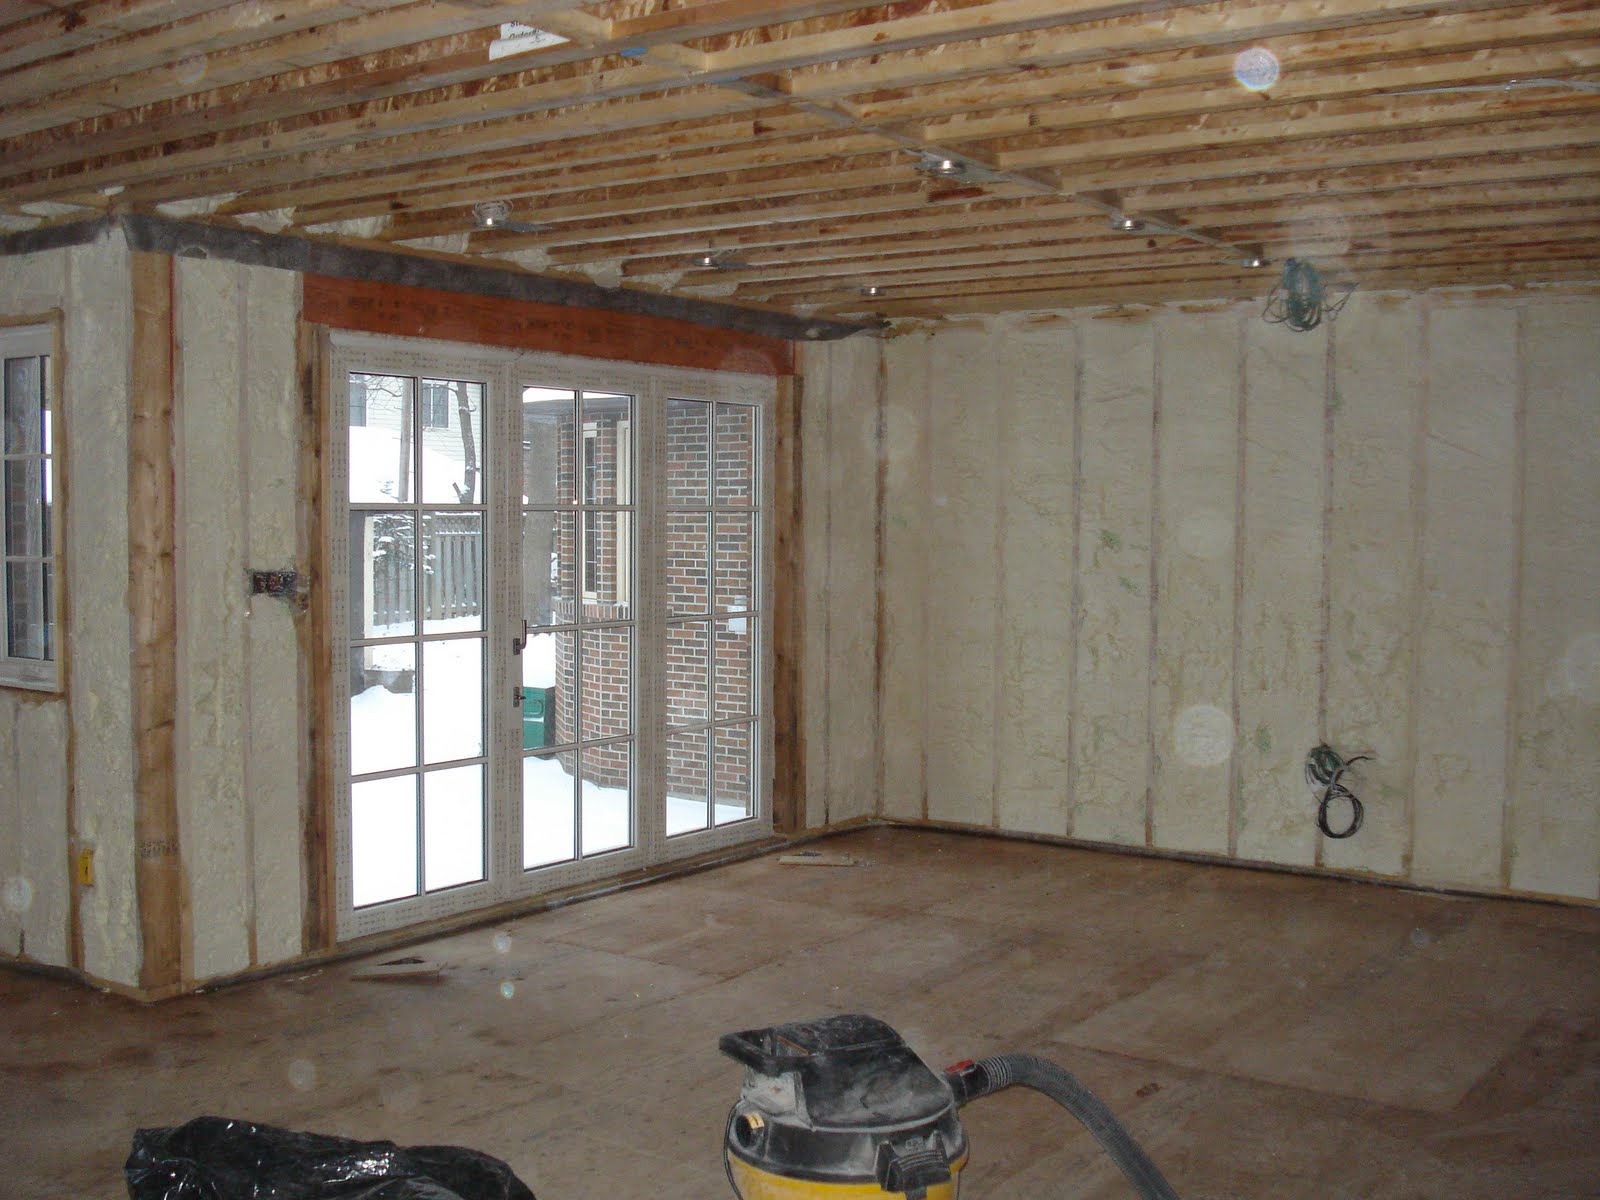
Our dining room before felt a bit cramped at times. There was a big honking radiator under the window and the opening to the living room was off center, small, and had double doors. They were nice doors however, gumwood with leaded glass inserts. We sold them.

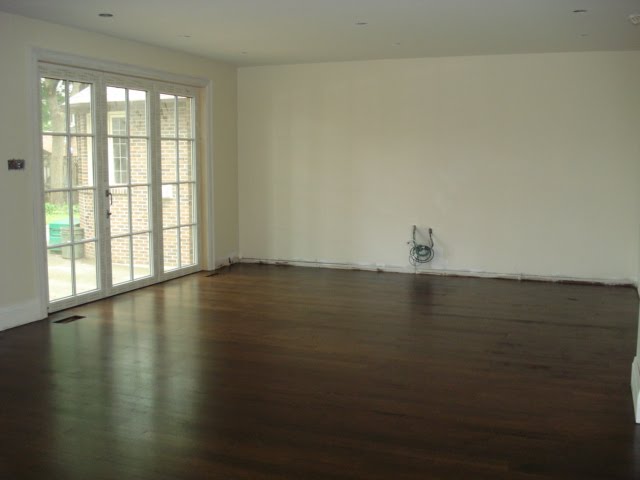
So with the radiator and window gone we felt that we needed to do something to open up the room and get some light in there. Rob’s mom had suggested before the reno started to open up the dining room to the living room and that was a really good idea. The changes give us substantially more dining room area and when we have large gatherings we can spill out into the living room, if we have to.

Since we lost the window, the dining room is darker, however we will be painting out the wainscotting, which I think will make it alot brighter. That coupled with the wider opening should do it.

Wednesday, June 9, 2010

I'm Floored!

“Reno heartache and headache to reno joy”

One of the most difficult and important decisions you need to make during a renovation is the flooring. Way back in an older post we showed the wood flooring we were going to put into the Georgian reno. It was prefinished Jatoba with a very dark redish brown finish. When it came time to prepare for installation we had decided that we wanted the boards to run the length of the house, as opposed to across the house. This created our first problem. Various installers told us that we needed to add another layer of subfloor in order to run the boards in our preferred direction as the engineered floor joist system in the new house ran in the same direction. Urgghhh. Call in the troops!

Over 2200 sq ft of 3/8 inch plywood had to be installed in the house. Glued and screwed to the existing floor, in which we had already installed over 2500 floor screws into to prevent squeeking. We had tremendous help from our friends Dennis Santos, Rommel, Dave Falcone and Lino Pessoa. Most of the job was completed over a weekend with Dennis and Rob finishing the upstairs master bedroom on Rob’s birthday! What a gift!

Rob and Jim Mcneil had already picked up 107 boxes of the jatoba hardwood with the help of Stacey and Danny from Superior Towing who brought a flatbed tow truck to pick up the goods. The trip home from the pick up is one we will never forget as we were unable to tie down the boxes of wood to the truck. Luckily not one box fell off. Rob and Jim spent the next few hours hauling the boxes into the house with half of them having to go upstairs. Brutal job.

Next up major disaster. Once our original installer began installing the jatoba it became clear we had a problem. The finish on the ends of the boards were chipping! As well, the installer was not happy with the quality saying that there were too many “bad” boards. He had already installed about 500 square feet by the time we halted and called in the owner of the flooring store. The next day Rusland the owner of AA Floors came in to inspect. To his credit he agreed with our installer and said that the product was not up to the quality it should have been. If we wanted, he would replace it all with new product. Great.... now we get to rip out 500 square feet of bad hardwood!

Decision time. Take a chance on more Jatoba or bail altogether and go in a different direction. In looking at the overall effect of the already installed jatoba, we concluded that it was too dark and the finish wasn’t really what we had envisioned for the house. Others agreed. Some of the professionals we had in to price the installation suggested that we go with unfinished hardwood and finish it “on site”. But what type of wood to go with? Quarter sawn white oak was the resounding response. Hmmm… white oak for White Oak. Coincidence? We think not!

Rusland exchanged the jatoba for the unfinished quarter sawn oak. 4” wide boards of select and better. They picked up the old stuff and delivered the new at no charge. On the advice of our friend Mario Furtado of Marana Kitchens, we hired Greg Slazony and his crew to do the installation and finishing.

The process is this: Install flooring. Then fill and sand. Then stain. Then first coat oil based lacquer. Then buff out. Then second coat oil based lacquer. Then finish interior work on the house including all cabinetry, painting, and trimming. Then buff second coat, and apply top coat of a water based semi gloss sealant.

Choosing the right color for the stain was unnerving. It’s a big decision and you want to get it right. Our kitchen island for example is mahogany finished in a mediumto dark brown, so it needs to look right against the floor color. Once the floor was installed and sanded, Lucy and I went to the house, where Greg and his expert stainer Bogdan layed down what seemed like countless samples swatches of various browns. We narrowed it down to two which were both walnuts with some reddish tones. To set our minds completely at ease we asked our designer Rosi to come in for her opinion. And so it was settled. Natural Walnut.

The floors are now completed to the stage of the second coat of varnish. They are absolutely amazing and we are over the moon with the results! We love it, it’s that simple. Even though it set us back almost a month with all the trouble we had, in the end, we are happy the jatoba was no good.


Next up...... Friday our Kitchen from Marana Kitchens gets delivered and installed. We're pretty excited and we'll keep you posted.

Foyer makeover

Everybody loves before and after shots, so here’s something to chew on. The old house was a bit of a mess with respect to the foyer area. Once inside the front door there was an airlock with another door which probably made sense 70 odd years ago but not anymore. We removed that door and wall (and a small radiator). Once inside the house past the airlock, access to the coat closet was a bit awkward. The closet was cold and drafty as well due to the mail slot location and no heat source.

With the airlock and radiator gone we were able to relocate the opening to the closet. Rommel supplied and installed an airtight mailslot in the small window opening inside the new closet. We retiled the foyer floor inside the front door. Finally our carpenter installed our new closet door but used the original cut glass door hardware to match up with the existing French doors to the living room. We also installed a door light switch and a pot light in the closet so that whenever the closet door is opened the light will come on.


Time to bring in the Pros!

We have been doing a lot of trim work, but there comes a time when you need the best. We brought in Marcio and he did some fantastic work for us. He installed our pocket doors (3), hung all of our new doors (7) and fixed our dining room wainscoting from where we had lost a window. He also repaired our staircase. Not to mention a number of other things that we came up with as we went along. Please note in these pictures we have not yet done any painting to the wainscoting which we will be painting out in cloud white.


Finishing touches...

Once we finished painting the ceilings and put one coat of paint on the walls we started installing crown moulding. Afterwards was baseboards and casing trim around windows and doors. We decided to keep the original look of the house with the trim and we are really happy with that decision.


In living color

Once the drywall was finished, Rob started painting. The entire house will in the end, be painted from top to bottom. First primer on new drywall, then sanding, then first coat. Once all the cabinetry and trim is finished then one last sanding and final coat of paint.
We always use Benjamin Moore paint. The new water bourne 'Aura' paint on the walls and ceilings of the first floor and 'Collections' upstairs. We chose Cloud White in a flat finish for the ceilings and crown mouldings. The walls were all painted 'Feather Down' in an eggshell finish. Lucy just couldn't decide on individual room colors this early in the game, so neutral throughout it is. The baseboards and other trim is in oil based paint, satin finish, in 'Cloud White' as well. Painting trim is particularly onerous as it is all new wood and there is a lot of sanding in between coats of paint, not to mention the filling of every hole and crack with filler and caulking. We will also be painting out the vast majority of the old wood trim, like the mantle, living room crown moulding, dining room wainscoting and stairway. A huge job in itself.

Feather Down Cloud White

Tuesday, June 8, 2010

Off the wall


Leo, from LG Drywalling won the bid for doing the vapour barrier, drywall and taping job in the house. When we first started this project, we were expecting to drywall the new addition. We ended up drywalling the demolished areas of the old house and the walls and ceilings of the three old bedrooms. It was never our intention to do this, however, we saw more cracks had developed, I guess as a result of the construction. Leo advised that it was the way to go. Lucy had nightmares of more construction some day down the road and so was convinced to get it all done now. Just another way to blow the budget! In the end, there are only three walls in our living room that were left in the original plaster.


Knob and Tube be Gone!

Paul from Derock Electric did the wiring in the house. As previously mentioned, we upgraded the electrical service for the house from 100 to 200 amp service. We built an electrical closet where all the wiring for the house will be centralized. Everything has been replaced. Wiring, electrical boxes, receptacles, switches, etc. We have installed over 50 new pot lights in the house and added outside downlighting to the rear of the house. It took about 2 weeks to rewire the entire house back in January.

We blew it!!

Once the house was vapour barriered and the ceiling drywalled we took on the task of insulating the attic area. We chose 'GreenFibre' natural fibre blow-in insulation. This is the product that is made from recycled newspapers and other substrates. It comes by the bale and you basically dump it in a large hopper which chews it up and shoots it up a long flexible pipe into the attic. We set up the hopper outside the house and our good friend Jim gave us a hand. Jim and Lucy loaded the hopper while Rob was up in the rear of the attic with two way communication and an air mask. We managed to achieve about R45 to R50 in the attic. It was a dirty, messy job. One that Jim and Lucy do not want to repeat.

We got Gas!

We had installed a natural gas furnace and water heater, but still needed to have gas run to other appliances. Rommel’s friend Frank came in and ran the gas lines for us. He used ¾ inch flexible “track” pipe to run gas for the Dacor cooktop in the kitchen. He also ran line to the back of the house for the BBQ. Sometime in the future we will be running gas out to our garage so we can get heat there as well. That will come in handy one day when I work on my 'hobby' car.